Order approved, customer waiting, and someone in the stockroom asking out loud, “Where are the black size M leggings?” If this scene sounds familiar, you’re not alone… and the problem probably isn’t your team.
As long as the catalog is small, you can rely on the memory of whoever stocks the shelves. But fashion has a cruel quirk: each style comes in multiple variations. Three colors in five sizes already add up to fifteen different SKUs for a single product. Add in the new collection arriving, similar items sitting side by side, and a new hire on the picking team… and memory just can’t keep up.
That’s exactly where logistics addressing comes in.
What Is Logistical Addressing (and Why the Fashion Industry Needs It So Much)
Logistics addressing means assigning a unique code to every location in your inventory, just as a street assigns a number to each house. This way, the system knows exactly where each item is stored, and the question “Where is it?” no longer depends on who put it there.
It may seem like a minor detail, but it changes the entire workflow. The picker no longer needs to know the inventory by heart: they receive the address and go straight there. A new employee learns the system in days, not months. And when something goes missing, you know exactly which shelf to check.
In the fashion industry, this is even more critical. There are size charts, color variations, nearly identical items across collections, and sales spikes that all hit at once—like on Black Friday. The more similar items you have, the more expensive each “I thought this was the one” mistake becomes.
How to read an address: area, rack, column, shelf, and bin
A complete location code has five parts, always in the same order. See the example below, where the code 1-3-6-5-2 refers to a single location in the warehouse:
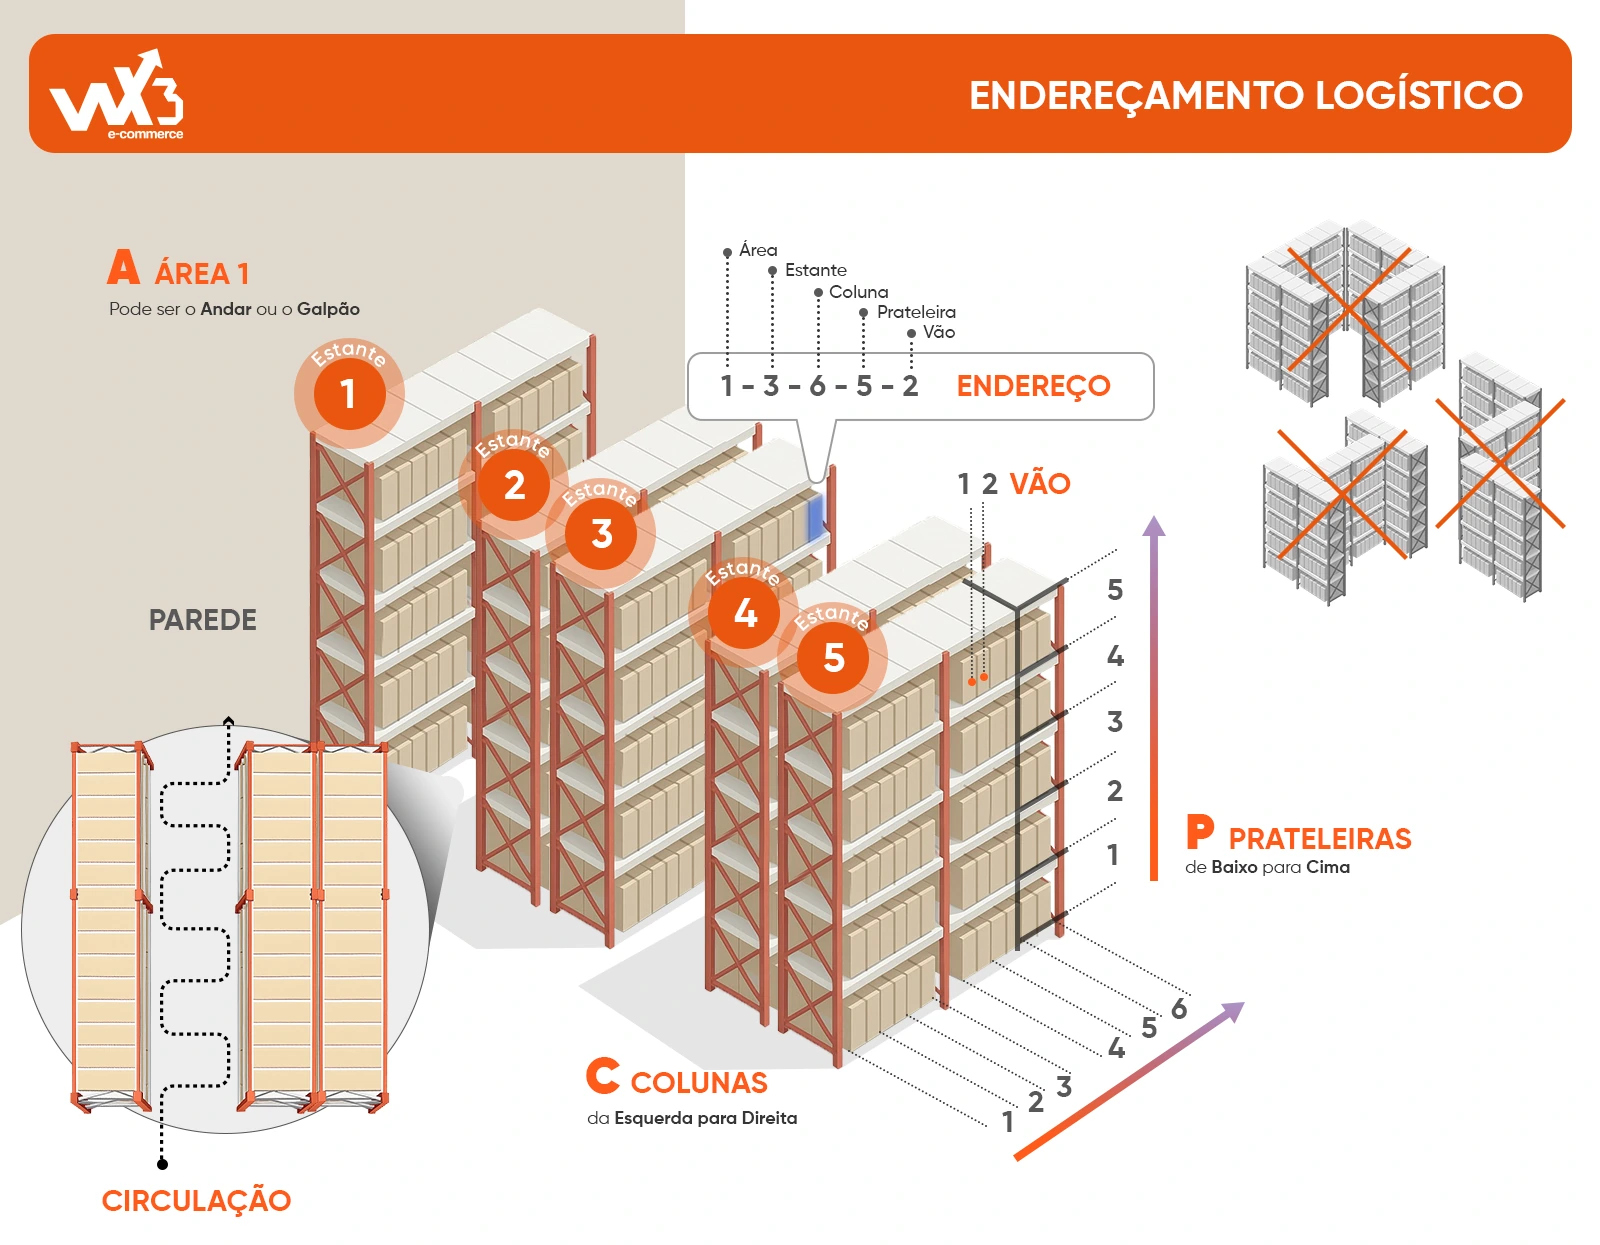
- Area: the floor or warehouse. If everything is in a single space, it’s area 1.
- Rack: the entire structure, numbered sequentially within the area.
- Column: each vertical block of the rack, counted from left to right.
- Shelf: the levels of each column, counted from bottom to top.
- Bin: the specific position within a shelf when it holds more than one item.
The golden rule is consistency. If one rack counts columns from left to right and the neighboring one counts the other way around, the address loses its meaning and the picker has to visually search again. Choose one direction and apply it to the entire inventory, without exception.
The layout that minimizes the picker’s walking distance
A good address system alone isn’t enough if the path to it is confusing. The most effective layout is one with shelves facing each other, all facing the same direction, stretching from one wall to the other. This way, each aisle has shelves on both sides, and the person sorting items walks down it just once, picking up what they need from the left and the right.
And what should you avoid? Shelves arranged in an L-shape, U-shape, or zigzag pattern. They create dead corners, force you to retrace your steps down the same aisle, and disrupt the sequence of numbers—which is precisely what gives the route its logic.
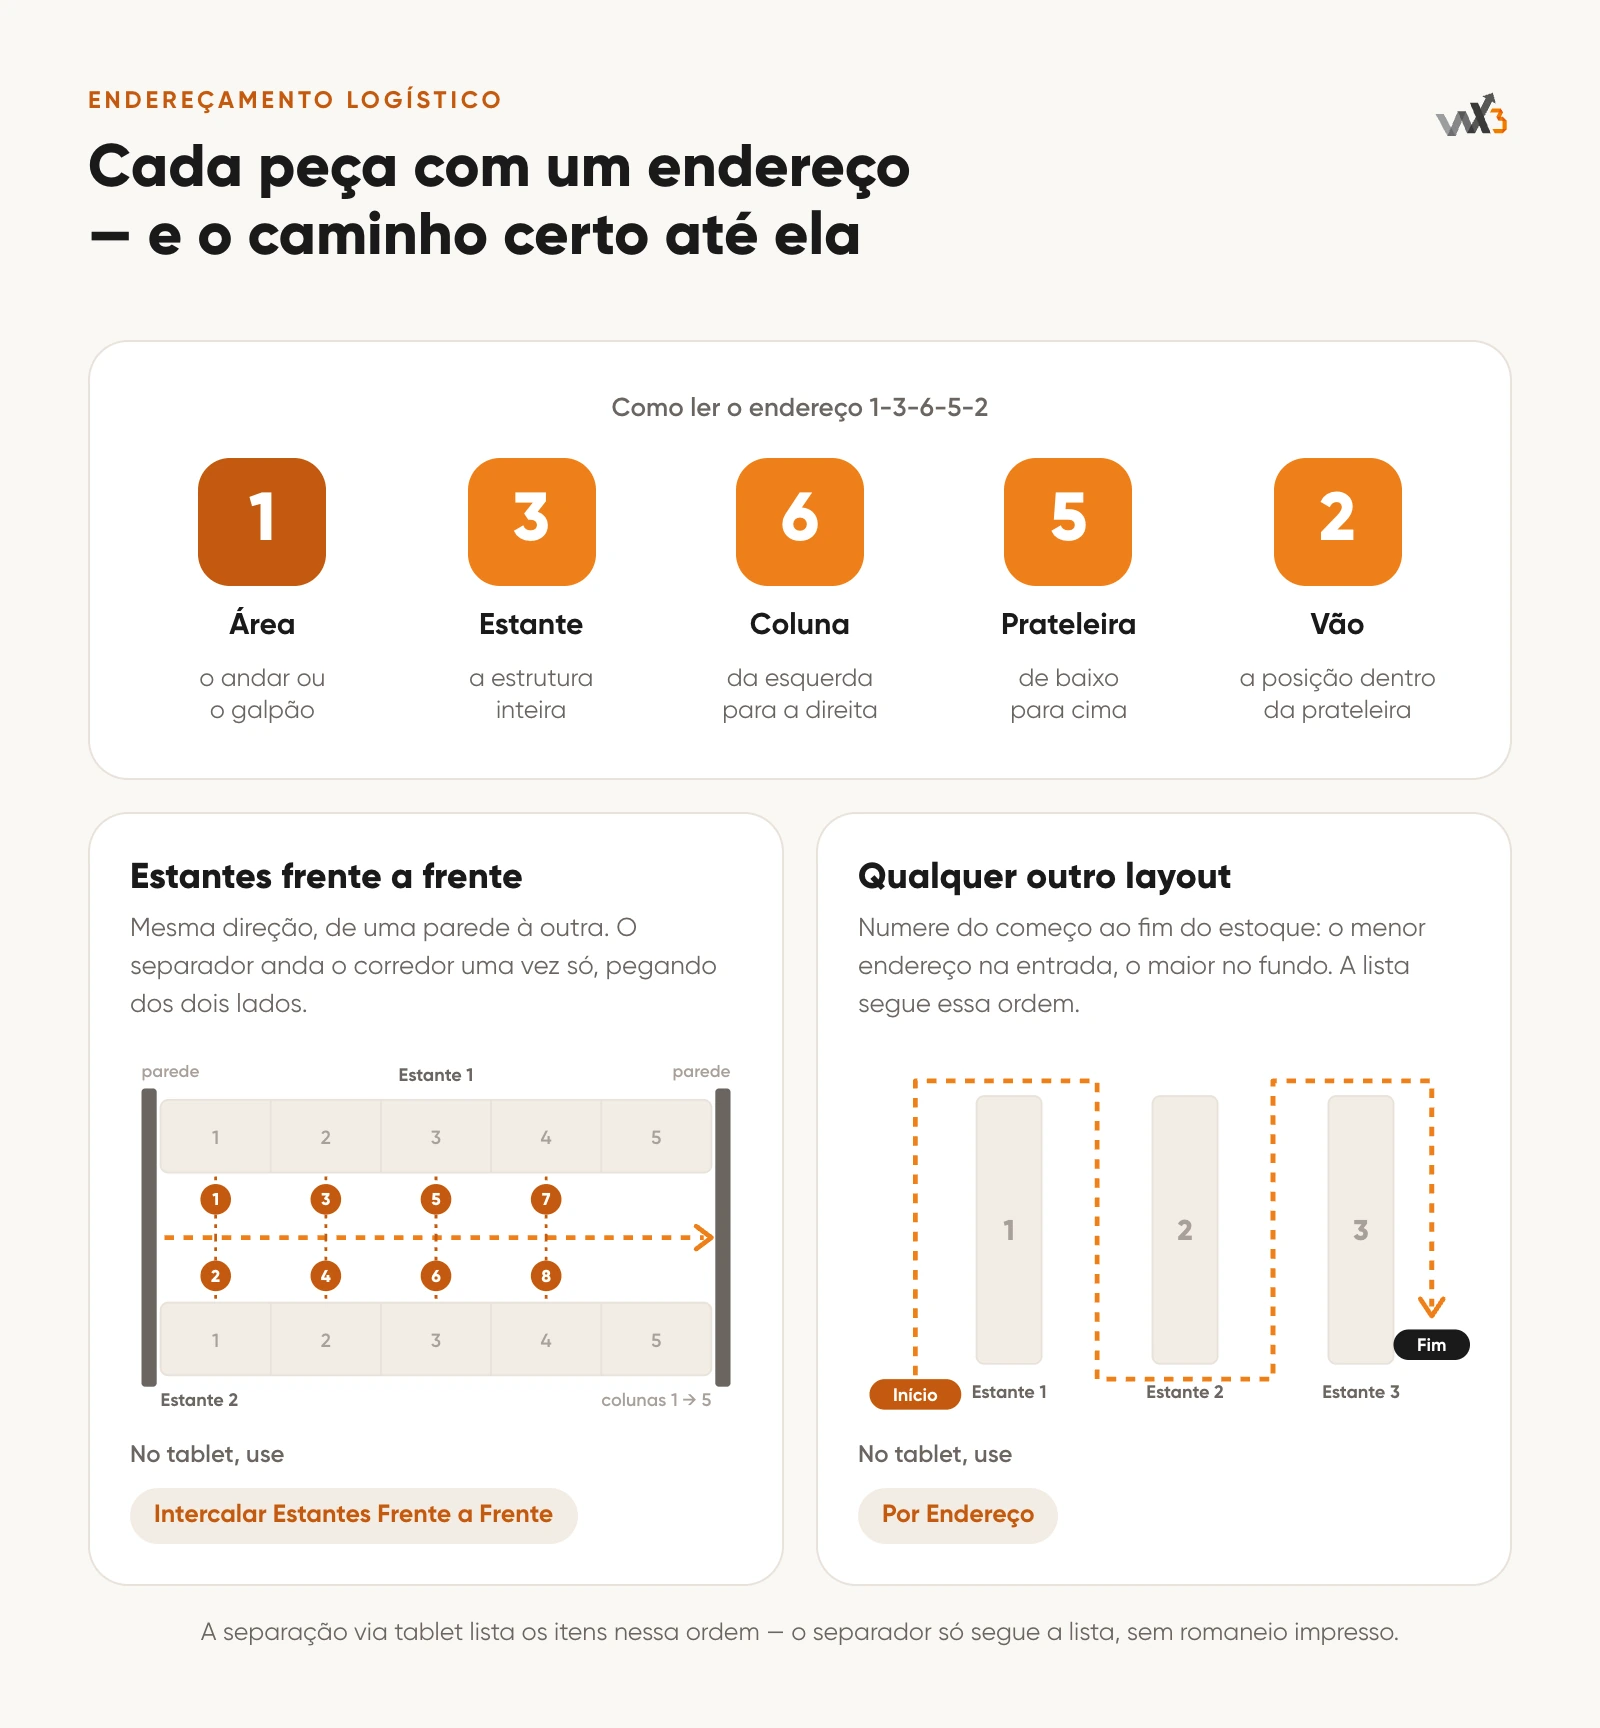
But not all inventory fits this layout, and that’s okay. If your space has a different shape, the solution is to number items with the path in mind: the lowest address goes at the beginning of the storage area, near the entrance, and the highest goes at the end. This way, following the addresses in ascending order naturally leads you along the most logical path through the space.
Address in the System: From the Registry to the Shelf
Once the space is mapped out, the next step is to import this map into the system. On the WX3 platform, you specify how many areas there are, how many racks per area, how many columns per rack, how many shelves per column, and how many bays per shelf. Based on these numbers, the addresses are generated all at once, without anyone having to enter them one by one.
Then, each product is linked to its address on the item’s inventory screen itself, along with the current quantity and the maximum quantity that location can hold. A single item can be assigned to more than one address, which is helpful when a best-selling item doesn’t fit on just one shelf.
One important point to note: the inventory for each location is adjusted manually. When merchandise arrives, someone needs to record which location it was stored in. This is what keeps the layout map accurate, and it’s a habit the team needs to adopt from day one.
For day-to-day operations, there are filters that show occupied or empty locations—with or without inventory—and allow searching by area, rack, column, and shelf. When returning an item, simply scan its label to view its locations and put the item back in the correct spot.
Picking via tablet: the list is already in the order of the route
It’s during picking that all this care pays off. Instead of printing a packing slip, the picker uses a tablet: they select the orders to be picked, print the labels, attach each one to an empty box on the cart, and get started. The screen lists the items from all selected orders, each with its own address.
And the order of this list follows the layout of your inventory. With shelves facing each other, the “Interleaved Facing Shelves” sorting method alternates between the two sides of the aisle, so no one has to backtrack. In any other layout, the “By Address” sorting goes from smallest to largest—which is exactly the numbering you set up with the route in mind.
Each order is assigned a color on the screen, so it’s easy to know which box to place each item in. Once you’ve picked up the item, just tap “Set Aside.” If the item isn’t where the system indicated, the “New Address” button finds another location with inventory in the same area. Orders with items in another area are sent to the next floor, and those that are complete go straight to quality control.
At the end, a report shows how many items and orders each person picked and how long it took. With these numbers in hand, you can track the team’s progress and identify where inventory is hindering operations.
Where to Start
You don’t need to halt operations to organize everything at once. A simple step-by-step guide works well:
- Map out the space: define the areas and the flow of movement before touching any shelving units.
- Number items along the path: racks and columns from left to right, and shelves from bottom to top.
- Physically label each location: the address must be visible on the shelf, not just in the system.
- Record and link the inventory: take this opportunity to count the items at each location and start with the correct layout.
- Establish a routine: every incoming item and every return must go through the designated location, without exception.
An organized inventory is one where anyone on the team can find any item, even on their first day on the job. When that happens, picking is no longer the bottleneck, and orders ship at the same pace as sales come in.
And if, having read this far, you’ve thought about how many times a day someone asks, “Where is this item?”, maybe it’s time to take a closer look at your operations. In our free e-commerce assessment, we’ll work with you to analyze everything from inventory to order fulfillment and identify the bottlenecks that are holding back your brand’s growth.